Gardening tips
- Save Seeds and buy them when they go on sale later in the year: Keep all your seeds in a cardboard box in your refrigerator. The permeability of cardboard prevents any excess moisture accumulation that might cause mold, While having a single place for seeds makes it easy to retrieve them. I have been doing this for almost 50 years, with no problems (same box!). I have found all seeds to be viable for 10 years or longer. I have corn seeds that germinated nearly 100% after 15 years and Kentucky Wonder Pole Beans which had 8 out of 24 seeds germinate after 33 years!)
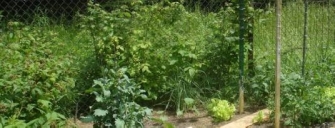
- Rather that planting in long rows, plant many vegetables in groups of a few, but also plant them in different places: This not only confuses the bugs but for some reason, some places will do very well, while other spots may fail. The result is an increased chance of success.
- Use diameters instead of row distances for plants: I think the recommended Row spacing on packages allows for tractors to fit between! Some examples that work: Kohlrabi take up an 9-10 inch circle. Beets and Carrots take 4-5 inch, but Carrots can also have some plants close together just pick the crowding ones first, leaving the adjacent one to fill in.
- Plant shade tolerant vegetables in places with only half or a third of sunlight: This works well for Beets, Carrots, Arugula and Kohlrabi. But NOT for Peppers, Tomatoes, Potatoes or Lettuce - these should get your sunniest spots.
- Plant some vegetables amongst your flowers: Beets are very ornamental, with their green and red-lined leaves. Carrots, Basil and Kohlrabi also look good there. And Beet Greens are edible (even raw in salads). Or cook them like Spinach or Swiss Chard. Kohlrabi tend to spread their wide green leaves so they only look good where these effects are desired, but Kohlrabi does well with slightly less than half sun.
- Garlic: When processing garlic cloves, set aside the tiny bulbs which are too small for cooking. Later stick them a into the soil about an inch (root-side down) any time of the year and anywhere you have at least half sunlight and a 4 inch patch of space. Between other plants is a great place for them as garlic is said to ward off some bugs. The ideal time to plant garlic is in the Fall (October) but they will grow most anytime. You can also pick the green slender leaves as needed, chopping them finely for salads or seasoning. Otherwise, the bulbs can be pulled when the plants die in late Summer (forgotten bulbs will re-sprout in the fall and over-winter).
- Plant Leaf Lettuce and Arugula in beds spaced about 2 or three inches each way instead of in rows: Either: Use a pencil or golf tee) to make holes for each seed. Or: Sprinkle seeds lightly, cover with dirt and thin what comes up. Either way is work, but it is less harmful to the plants and results in a more uniform plot to plant seeds individually. Arugula is the fastest sprouting plant I know of …coming up in only 3 days during warm weather!
Note: If covered lightly when the temperature goes below about 20ºF, Arugula will over-winter and be your first crop of the next Spring! If it snows about 3 inches or more, Arugula will survive near-zero temperatures without a cover. And they are great in salads!
- Easy method for Storing garden-fresh Basil: The best way to preserve Basil is NOT to dry it. To preserve the aroma of fresh Basil, pick the leaves and flower buds at a time when they are dry. You don't want them wet, so if they are dusty (which rarely happens) sprinkle clean water on them and wait until they dry naturally before picking (their waxy leaves let any dust easily rinse away). Trim the stems off and put the good parts (un-chopped) into a plastic bag (old, long newspaper bags work best here). Then gently flatten the bag to push excess air out leaving three times as much empty space empty in the bag (for later crushing) and secure with a twist tie. Put the bag in the freezer for at a day or until next picking. Have towel and a zip storage bag ready when you take this basil bag out of the freezer. Cover it top and bottom with the towel and kneed it thoroughly with your fists to crush the leaves into a near-powder. Then remove the tie, and quickly transfer the crushed basil into the storage bag and put it in the freezer (Easily done by placing this bad inside the storage bag and turn it inside out). When ready to use, sprinkle some frozen basil into your dish or cooking pot and put the rest back in the freezer. Hint: I keep the newspaper bag in the freezer and only remove it when crushing the previous batch of basil and adding your new pickings.
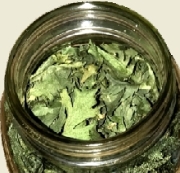
- Celery Leaves are a good Spice: I grow Celery, especially Celeriac (AKA "Root Celery") mainly for the leaves. When there are mature stalks, I pick them and cut off the leaves (no stems). I do not wash the leaves, but if dust or dirt is present, I sprinkle the plants with clean water and let dry before picking. Then I spread the leaves (one layer) onto large flat trays to dry in the oven. I set the oven to 150-170ºF and turn the leaves over using a spatula about every half hour so the moist side is up. Once dry, I put the leaves into quart jars. These dry leaves will last many years. To use, I pour a handful of leaves into my hand and crush them into a powder that falls into my Stew, or onto my Scrambled eggs.

- Tomatoes: I have great luck with Early Girl plants. I buy them early (late April) at the nursery and then quickly re-pot them to larger pots that I can leave outside in the sun when the weather is above 40ºF (With larger pots your plants will grow faster). Transplanting is best done on cloudy days of just before rains, which puts less stress on the plants. Sometimes we get the first ripe tomatoes by the 4th of July (Ohio)! These tomatoes are medium sized, round with few imperfections, uniform ripening and are very tasty.
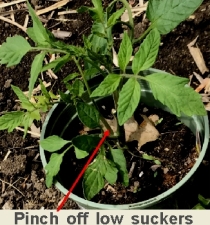
- Note that you should pinch off the suckers (low lying shoots) to encourage the plants to grow upward.
- If you stick the larger suckers into well moistened soil, they will grow into new plants! Be sure to water these suckers frequently and cover them with a bowl when the sunlight is intense, until they adapt.
- Over half these suckers will likely re-root and survive. This year, I bought 8 tomato plants and had 15 surviving sucker shoots out of 20.
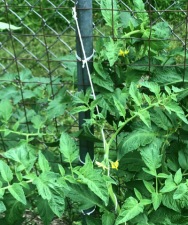
- Tomato Support: I plant tomatoes in rows about 30 inches apart, with 36 inches between rows for walking, picking and tying plants (I place long, wide boards between rows). For a trellis, I use 2h x 2.5w x 24 inch tall fencing starting about 26 inches from the ground. I use 6 to 8 feet long fence poles (one between each plant and 1 at each end). They are just painted wood sticks or large, straight branches, metal pipes and some "real" metal posts that I might have bought years ago.
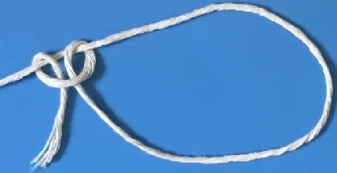
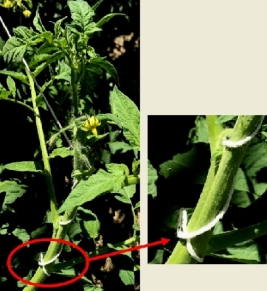
I dig a narrow hole in the tilled soil and push the posts about 8 inched deep (as far as they will go). Then I position and tie the trellis to the each post using two laps of cotton string in three or four places spread evenly. I start with one temporary tie away from the end, followed by another a ways away. Once the height is settled, I do the permanent ties, using slip-knots pulled tight against the posts [pic], and locked by one more knot.
I cut points on the ground-end of wood posts and coat parts that go in the ground with Maxim Water Seal. In the Winter, these sticks are brushed, rinsed and stored in my garage attic. In the Spring, I cut off any rotted ends and re-apply Maxim to the ground ends. If a wood post becomes rotted, I cut off the rot and re-point (OR I point the other end and use that to stick in the ground). Sticks last over 30 years!
I use regular cotton string to tie the fence to the posts, making two laps around, in three places on each post. Later, if posts seem blown tilted, I get a large stick, put it in the ground at about a 30 degree angle and tie the other end to the fence or post (probably using 4-5 laps of string).
Once Tomato plants start flopping over, I tie the main branch with cotton string (2.6 lb. size) by first wrapping three or more spirals along the branch with the string end tucked under the last spiral. Then I gently snug all the spirals so any slack is removed (remember, the strength of a knot is in its friction). This way, the tomato branch is securely tied without choking off future growth. Now, the other end is held up to the trellis and cut a few inches longer so I can tie it on. Once the plants grow, I tie up any hanging branches, guiding them apart so their leaves get sunlight. Also, when possible, I thread some branches through the trellis wire, instead of tying.
- Peppers: The secret to large peppers is sand (regular construction sand, not sandbox sand). For years, I grew sweet bell peppers and they were always small. For years, I grew sweet bell peppers and they were always small. At the end of the season, I would pull the plants out and noticed that the roots had barely moved beyond the ball I bought them in (I have a clay soil, but lots of compost). Then a friend told me to add a handful of sand to the soil at each plant. WOW! Since then, I have enjoyed bell peppers the size seen in stores. The plants get so big that I have to prop up the peppers with Y-shaped sticks to prevent the branches from snapping (see below).
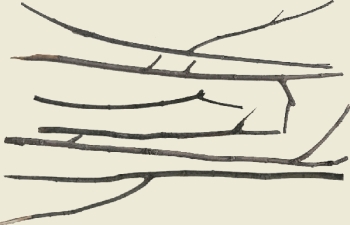
- Use Sticks to support Pepper plants: The branches on Pepper plants break easily, especially when Bell Peppers grow large (like you want). Even if branches don’t break, the heavy plants may fall over, letting your peppers lay on the soil and prone to attack by bugs An easy solution is to use "Y"-shaped sticks to support drooping branches. I collect an assortment on "Y"-shaped sticks (9 to 24 inches long) early on, so I have a selection to suit each case. Just place the branch or stem of the pepper into the "Y" and stick the other end in the soil. Sometimes I have to use 2 or 3 sticks around plants to stabilize them. Some Y-shaped sticks are shown below. Soon, I will add a photo showing their use (when my peppers grow). Maybe you have other plants that need support!
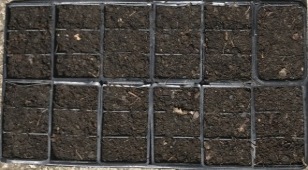
- Starter Pots: I use left over pots and trays from plants that I bought from the nursery in previous years. A little forethought can save gardeners lots of money while reducing their garbage footprint. I use the tiny (2 or 3 pocket) ones to start seeds, and the 3 to 6 inch diameter sizes to re-pot pepper and tomato plants that I bought from the nursery (until warm enough to plant). Did you know that the sucker shoots at the bottom of tomato plants (that you should pinch off) will often root if put a pot and kept watered. For the first week, cover them in a plastic bag to keep the moisture in. Give them gradually more sunlight.
- Potting Soil: I don't buy it, I make it. I use a mixture of half compost (from last year) and nearly half topsoil scraped from my garden, along with a little peat moss and sand. I use it in starter pots (see 11).
- Save seed trays and pots from the nursery: They are very useful for starting plants early the next Spring. If you plan to leave the pots outside, cover them with a clear plastic bag to hold the heat and moisture inside until they germinate.
- Preparing your garden: Every Spring, I rejuvenate the garden soil prior to planting:
a) Pull out any weeds too big to turn under. Exception: If this is your first time in this plot and if sod is there, then use a rototiller in part (e), to chop up the sod and mix everything with the dirt.
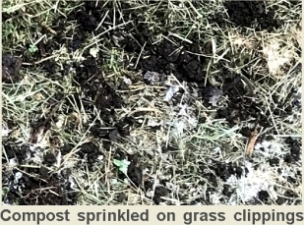
b) Spread 1 to 3 inches of old leaves (bagged last fall) or grass clippings or manure.
c) Sprinkle a little lime to counteract the acids of decomposition and add a little fertilizer to hasten decomposition.
d) Sprinkle a little compost to inoculate the soil.
e) Use a shovel (preferred ) or rototiller to mix in the new layer into the soil. A shovel works best for well-loosened soil and also makes it easy to bury the additions deep (It takes me about an hour to hand dig a section about 4 x 8 feet).
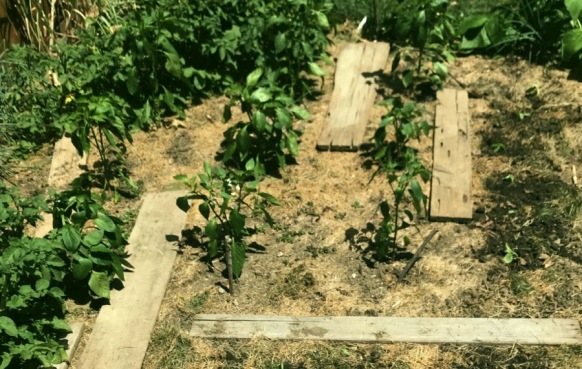
f) Use a rake to level the soil. To avoid compressing the soil with your footprints, lay down some old boards where you want to step.
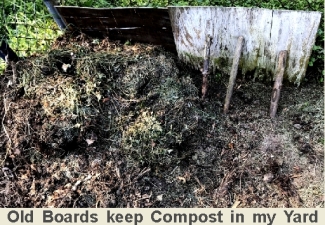
- Compost Pile: Start a compost pile when you have an accumulation of waste vegetation (garden scraps, leaves grass clippings). Find a permanent, well drained spot in your yard, (corners are good). If you are at a fence, use old boards, propped with sticks, to keep your compost inside.
Spread your waste vegetation in layers a few inches thick while covering each layer with about an inch of soil. If you worry about starting with useful bacteria, you can buy some at a nursery, sprinkling it about as you go. This is a one-time application as the bacteria will be there as long as some compost remains. Sprinkle water on the finished pile so that the pile is moist throughout.
- I have a small plastic bowl in the kitchen for table scraps, which I empty often into a large plastic bowl in the garage for garden and table scraps. When near full or messy, I empty this bowl into my compost pile, by digging a hole and adding the scraps.
- Mix a little old compost into the scraps to spread the bacteria then cover the scraps with compost. This is also a good time to turn any sections of the pile that have settled. Mixing discarded foods with old compost also discourages animals, as then there are not sizeable pockets of food for them.
- I tend to add compost near one end, moving forward as the pile grows so the more composted stuff is kept apart, ready to use (I use compost for items 14, 15, 16 and 17 above).
- Mulching -ALWAYS: A mulch drastically reduces weeds, holds moisture, keeps the surface from baking hard and encourages worms. Any weeds that make it through are easily pulled because the soil doesn't harden. The only downside is a possible increase in slugs. I use grass clippings applied 1 to 4 inches thick and apply other coats as they disintegrate. Other mulch materials are wood chips or hay, but grass clippings are easier and available all summer. I have a deal with my neighbor to dump his grass clippings over the fence when he cuts. He uses no pesticides of herbicides. The only problem is that I have to distribute the clippings within about 4 hours, because a pile thicker than about 6 inches will sour. Mulch nearly up to the stems of most plants, but mulch thin around peppers which like warmer soil. I use wide boards to step on in my garden and lift them before adding mulch(get boards from people's trash -they last about 10 years). Another advantage of mulch is that it keeps your plants free of splashed mud from rains. Beans especially benefit because otherwise their leaves pick up disease from the soil. Leaf Lettuce is much cleaner, but watch for slugs (If present they usually fall off and sink under water when rinsing in a bowl).
- Walk on old Boards: Don’t compress the soil with your steps. Place old boards everywhere you intend to step. When you mulch, lift these boards and mulch under them. Your soil will remain loose, absorbing more rain and encouraging root growth. Notice that pathways occur in the woods where people or animals travel, implying that soil compression impedes plant growth! I use scrap boards and often find them set out for garbage collection, so actually, I am repurposing what would have just been methane-belching landfill. In the winter I put the boards in my garage (dry). These boards usually last over 10 years.
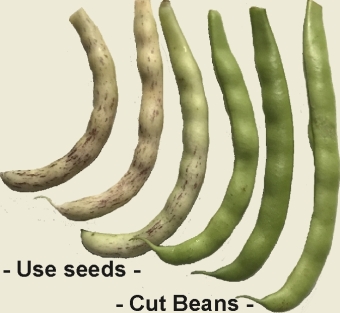
- Meaty Beans: Plant a few Pole beans (Kentucky Wonder, tan colored seeds) near Bush-type Wax Beans (black seeds). I notice that they tend to cross-pollinate such that some wax beans will send runners like pole beans and produce larger, green-colored beans. Saving these seeds and planting them the next year again produced runner style beans of enormous yield. Plant seeds 4-6 inch apart but expect them to spread out 3 feet wide.
I like a bean with very large seeds so I let them grow somewhat old before picking (see pics). I split the jackets on older beans and use just the seeds; otherwise, I cut the beans normally. Notice that the beans appear purplish or speckled, not black. When cooked, these beans produce a very meaty and delicious bean (but with stringy fibers). So be prepared to occasionally remove the strings from your mouth.


- Pick Fresh Vegetables all winter: I garden in Westlake Ohio and have run parts of my garden over Winter for at least 30 years.
Advantages are larger and fresh vegetables over the Winter and well into Spring (Hardy vegetables like Kohlrabi, Rutabaga and Turnips tend to grow very large in late Fall, while still being tender). Try to plant hardy vegetables in a space you can cover (I usually plant Turnips and Rutabaga in early August, but beets here need to be planted in early Spring). Some plants can be dug up (with their dirt) and moved to that space in the Fall when weather is cool and wet. Sometimes, in late Fall, I dig up remaining beets or Kohlrabi (along with dirt on their roots) and move them into the plot to be covered. Since the weather is now cool and wet, these plants don’t set back and I only water them the day they are moved. It's best to move plants just before a rain so you don’t have to water.
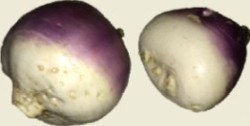
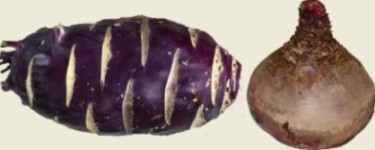
Left Turnip is 7 inch diameter, Purple Kohlrabi is 13 inch long
Disdvantages are that it takes some work to cover the plot when its cold and then to uncover it when it warms up for 3 or more days …and you can't miss a time or plants freeze and die. If it warms up for at least 3 days, it is best to uncover the garden so the plants get fresh air and sunlight, but you have to watch that the low temperatures don’t go below about 30°F.
If you are interested here are the details. Or you can get an overview from an article that Susan Brownstein wrote on my garden for the Plain Dealer newspaper in January 2023.
Enjoy! Ray Herrmann